Have you ever wondered how to repair wicker furniture? How do you start, and what is involved? What is the process?
Through my step-by-step photos and instructions below, you will learn repair planning and processes that are involved in wicker furniture repairs and restorations of this kind.
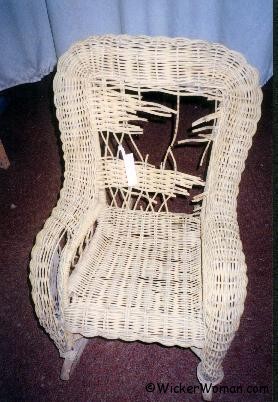
This cute little family heirloom Victorian child’s wicker rocker was in dire need of repair and needed to be almost totally restored.
My client wanted desperately to give it to his granddaughter to enjoy but in its present state, it looked like it was a good candidate for the dump instead.
Step-by-Step Child’s Wicker Rocker Repairs
- Assess Damaged Areas
- Remove Damaged Pieces
- Reweave Back, Seat and Wrap Arms
- Rebuild Serpentine Arms and Back
- Serpentine Arms Completed
- Wicker Rocker Repairs Completed
- Painting the Child’s Wicker Rocker
Some of the damage to the spokes and weavers was very apparent just by casual observation, but the major damages were not really obvious until close scrutiny and removal of the broken pieces.
Many of the spokes (ribs) in the rolled arms, back, and seat were broken completely and needed to be replaced. Because of this, I also had to replace many of the weaving strands after the spokes were dealt with.
However, the rocker was an excellent quality wicker piece circa 1890s-1910. It was woven with rattan reed on a hardwood, steam-bent framework that was still in perfect shape.
This sweet child’s rocker was worth every hour and every dollar it cost to restore this precious family heirloom to its former glory!
Assess Damaged Wicker Rocker Areas Before Repairs
Assessing the damaged areas and replacing only as much as necessary is the first step in each repair job. In this piece, almost all spokes or ribs in the entire serpentine rolled arms were either broken or cracked. And several spokes in the back and seat, running the full length of the rocker, were also broken.
Remove Damaged Wicker Pieces
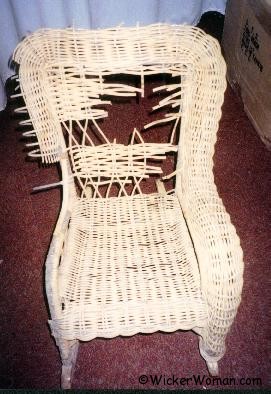
After the assessment, then comes the removal of all broken spokes and weavers.
Eventually, the tedious job of replacement and patching begins.
Holes in the wooden arm framework, where the spokes were inserted, must be drilled out to clear any remaining spoke material and glue.
Reweave Back, Seat & Wrap Arms
The rattan reed used in wicker furniture restoration of this kind is imported from countries such as Southeast Asia, China, the Philippines, and Malaysia. It can be purchased through most cane and basket supply companies here in the States.
All new reed must be soaked in water for about 20 minutes so it becomes pliable and doesn’t break during use.
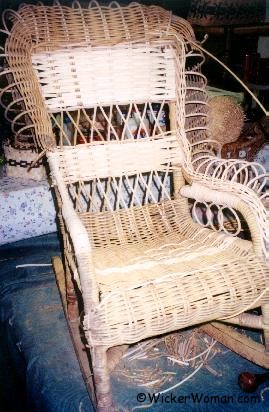
Before the weaving on the rolled arm can take place, the wooden framework must be wrapped first. Here I used 11/64″ flat-oval reed, and the chain loops under the arms were replaced with #6 round reed.
In this picture, replacing the broken #6 round reed spokes or ribs in the arms has begun.
I used yellow carpenter’s glue to hold the reed spokes after drilling out any remaining glue in the armholes, and also used the same glue for the frame wrappings.
The form you have selected does not exist.
Rebuild & Weaving the Serpentine Arms and Back
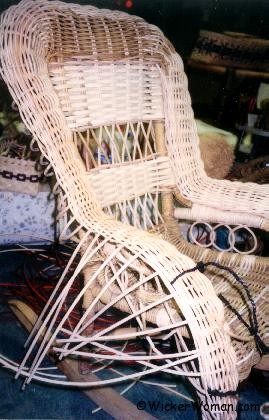
In this picture you’ll see that the spokes on the left arm and back were all replaced, making sure to follow the exact curvature of the original.
The weaving with 3/16″ half-round reed is completed on the left arm and most of the right arm, and the #6 round reed loops underneath the arms have also been replaced.
Weaving the right arm reconstruction is also featured in this photo. Braiding the ends of the #6 spokes below the curve and attaching them to the framework is the next step and it’s very difficult to do correctly.
Serpentine Rolled Wicker Arms Completed
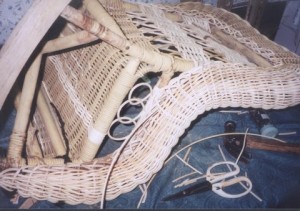
All areas of the serpentine rolled arms and back are now completed, and I’m just finishing up on the underside of the right arm.
The round reed spokes have been tacked to the hardwood framework underneath and the process of weaving over and under the spokes is nearly finished.
Leg wrappings are still to be done, but the project is coming along nicely.
Child’s Victorian Wicker Rocker Repairs Completed!
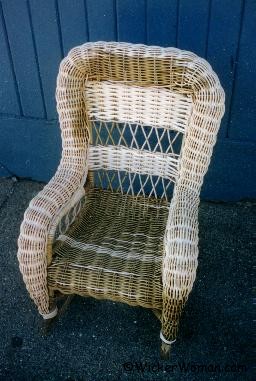
All light areas on the rocker are where I replaced damaged or broken materials, and will, of course, be invisible after the rocker is repainted.
Any hairy fibers that might have surfaced during the weaving have been singed off using a low-flame blow torch or lighter when the reed is still damp.
Whenever you singe the hairs from a reed piece of furniture or a basket, make sure the reed is damp, you certainly don’t want this wicker gem going up in flames!
Painting the Rocker as the Final Touch
This little antique wicker rocker still had its original yellow-beige paint on it, which the customer was going to have color-matched by a paint store and then repainted himself after my repairs were complete.
Had this piece originally been stained walnut or another dark color instead of being painted, I would have substituted smoked rattan reed for the natural reed I used in the repairs, because…
Smoked reed makes for a very easy color match with dark-stained wicker. Since smoked reed is already a dark walnut color, it only needs a couple of coats of varnish or one light coat of stain, to blend in with the original materials where patches or replacements were made. Cathryn Peters
Painting wicker furniture includes using two thinned coats of wood primer, applied by using either a compressor sprayer or a paintbrush.
When that has thoroughly dried, then apply two light coats of oil-based, indoor/outdoor house paint.
Latex paint can also be used, but I’ve gotten much better results myself using oil-base paint instead of Latex, seems to flex more readily and has a more durable finish.
Apply the paint carefully and lightly so you don’t get runs and globs of paint on this fine, intricate work and cover up all the details.
Allow the paint to dry several days to a week so it dries thoroughly before it’s put into use.
When my customer saw his little family heirloom wicker rocker all repaired and restored he was delighted and will enjoy this treasure for many years to come!

Thank you so much for visiting WickerWoman.com and we hope you’ve found this article on “How-to Repair a Child’s Wicker Rocker” helpful and will come back often to see further updates. Please Share This! article with your friends, use the handy social buttons below.
<– Back to Articles, Tip Sheets, Reports
Next–> to How-to Paint Wicker Furniture
